Modals
Modals, or shared components, are generally a series of related steps within a smaller program window that must be addressed before you are returned to the main program window. Some modals warn that your actions may have a specific consequence. The Steppers topic covers the specialized type of modal that walks you through a series of steps.
You will find standardized modals throughout the program as you work with your records. Some modal titles may change slightly based on the situation, but the actions remain the same.
Fields displayed in various modals may vary based on your user group field security.
To complete a series of actions in a modal, you will generally click OK to finalize the modal actions and return to the main program window.
Here is a small representation of modals you will encounter.
(Please rotate device to view content.)
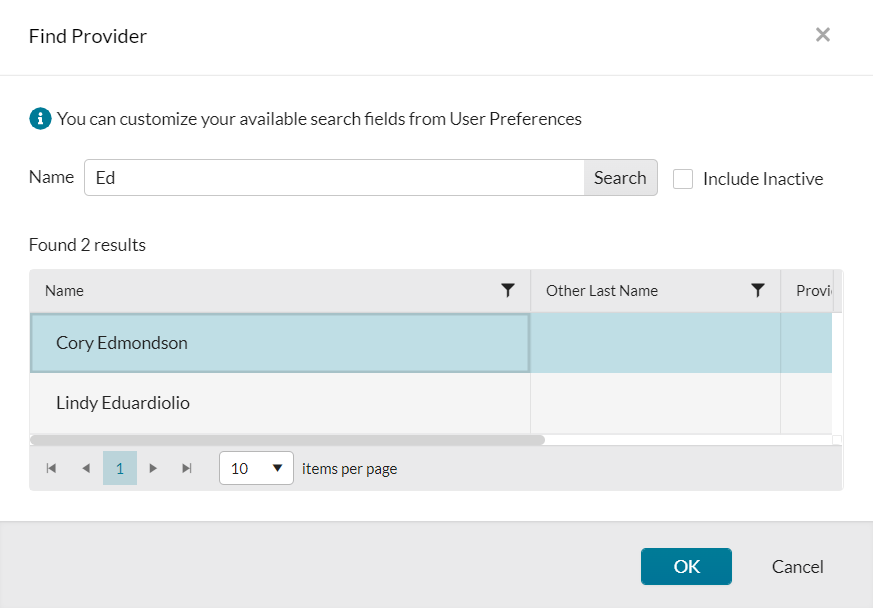
The Select modal can sometimes be accessed within a form by clicking Find. For example at the top of the Education form you can search for an institution.
You can include inactive items in your search, and if your results include more than 10 items, you can navigate through the additional records and adjust the number of items shown in each page of the modal.
Step through the find modal
To finish the find modal and open the form, complete the following steps.
- In the Name box, type all or part of a name, then click Go.
- Select an entry from the search results, then click OK.
-
In some specific scenarios, you can multi-select items by selecting the check boxes in front of the items to you want to select. The find modal above shows a single-select option; the following Add or select modal shows a multi-select option.
-
You can also set your search fields for a subset of find modals. (See Manage user preferences)
-
When searching by SSN, only the last four digits will display in your search results.
-
If using multiple words, enclose them in quotation marks and ensure that no extra spaces are included after the final word. Example; "John Doe"
-
When filtering a search, you can include either AND or OR indicators.
In some instances, when you want to add an external item, such as a board or a specialty, you are presented with a list of available options. In some cases you can filter items, and choose one or more items (including Select All). Click OK to finalize the selection.
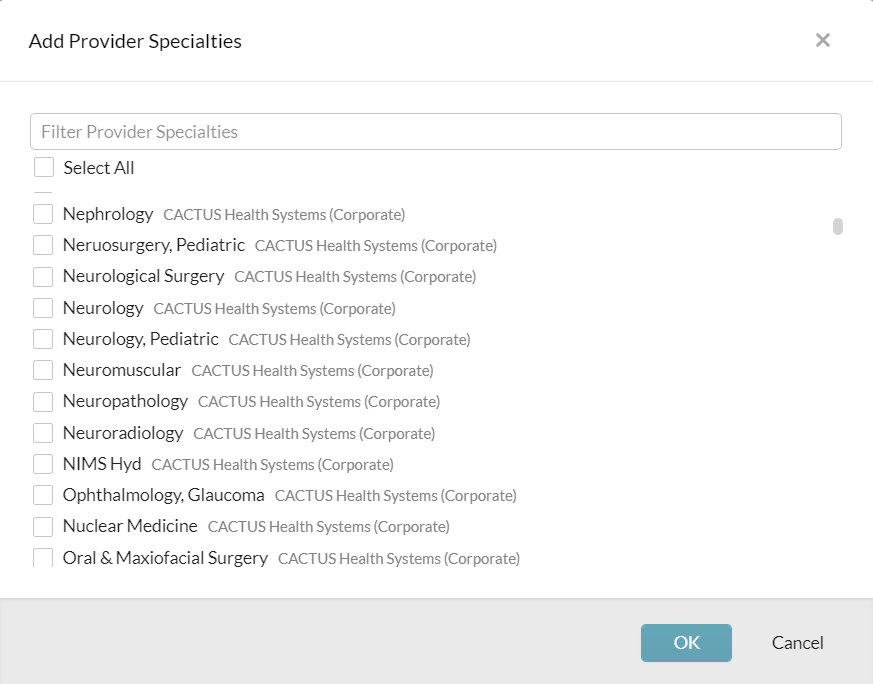
If you filter a multi-select list then click Select All, the list of filtered items will be selected.
When you enter a United States ZIP Code, the system checks for the city and state associated with that ZIP Code. If only one city/state/county exists for the ZIP Code, the system will auto-populate those fields. If multiple options exist for a single ZIP Code, you can select from a list of available options to populate the fields. If you edit the ZIP Code, the city/state/county will also be updated to match.
If your browser has autofill activated, it may cause contention with this modal. (See symplr Provider and browser autofill.)
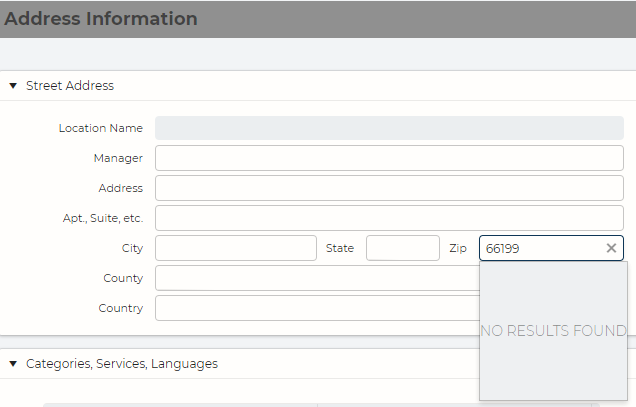
ZIP Code entry showing valid ZIP Code format, but no results. Click X to clear the field and try again.
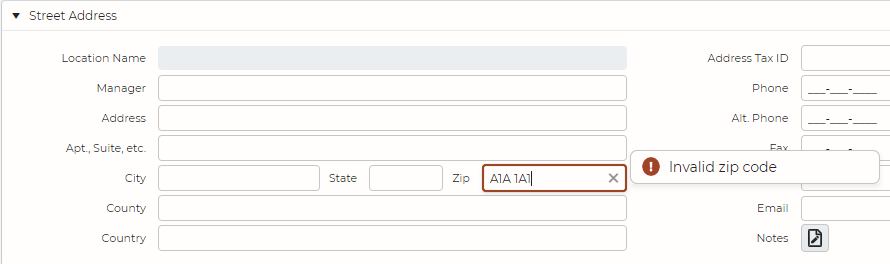
ZIP Code entry showing Canadian postal code. Incorrect entry is highlighted in red. The error message appears when you hover over the field.
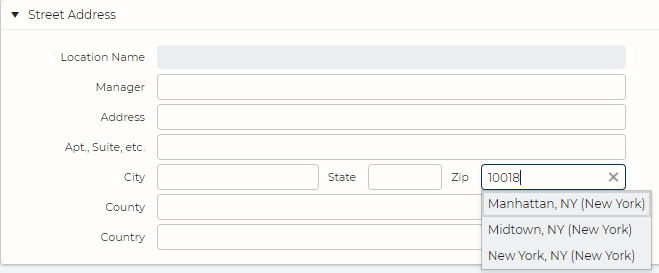
ZIP Code with several city/state/county options. Click an option to fill the fields.
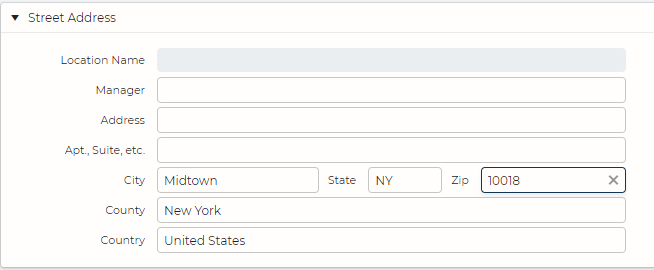
ZIP Code selection with associated city/state/county (and country) autofilled.
This modal verifies that you want to perform an action. You can either acknowledge or cancel the action. This acts as a safeguard before you perform an action that cannot be undone, such as a record deletion.
You can update the sort order and change display indentation in reference lists and select forms. When available, Sort Order is enabled on the toolbar under More.
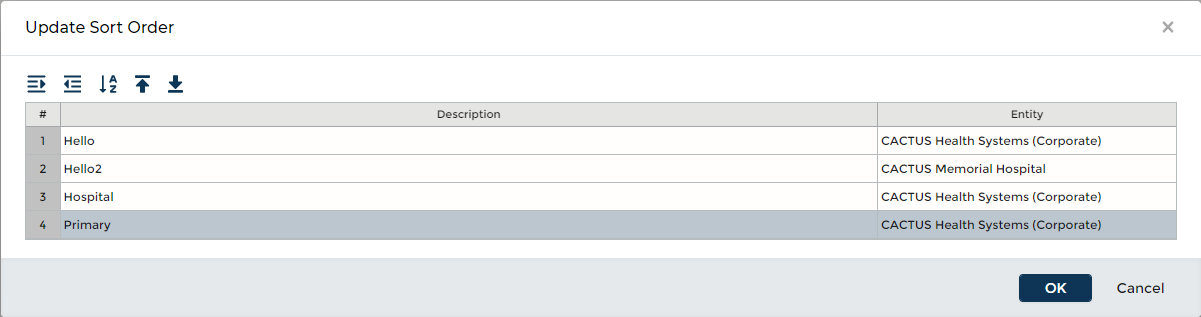
If you are unsure of an icon's purpose, hover over it to show the icon's name. You can perform the following actions:
- To establish a hierarchical arrangement, select one or more items in the list then click Indent Right or Indent Left
 .
. - Click Sort by Alpha
 once to sort in ascending order, and twice to sort in descending order.
 - Select an item in the list then click Move to Top or Move to Bottom to move the item to the beginning or end of the list.
 .
. - Hover over the item to move until you see the drag-and-drop crossed double arrows
 , then drag and drop the item to the desired location.
You can also drag and drop an item anywhere within the list. The number to the left of the entries help you orient yourself when moving items in longer lists.
For records whose text is not fully visible in the grid, you can hover over the field to see the full field contents.
Warnings and errors alert you to a condition that may need your attention. You must acknowledge the warning or error before you can return to item that produced the message. Warnings will allow you to save an item without taking any action; errors must be fixed before you can save the item. (See Manage error messages)